
Configure Cobra to Support Additional User Fields
Use this procedure to configure Cobra to use additional user fields.
To configure Cobra to use additional user fields:
Navigate to the Cobra folder and drill down to the Scripts\Create folder: <Cobra Installation Directory>\Scripts\<ServerType>Create.
For example:
- C:\Program Files (x86)\Deltek\Cobra\Scripts\SQLServer\Create (if you are using a Microsoft SQL Server database)
- C:\Program Files (x86)\Deltek\Cobra\Scripts\Oracle\Create (if you are using an Oracle database)
Note: For client/server and n-tier deployments, you can find the script in the Cobra folder on the server.Locate the required script and run it manually.
- If you are using a SQL Server database, locate Cobra_Enable_AdditionalUserFields_SqlServer.sql and run it using SQL Server Management Studio.
- If you are using an Oracle database, locate Cobra_Enable_AdditionalUserFields_Oracle.sql and run it using the Oracle SQL Developer.
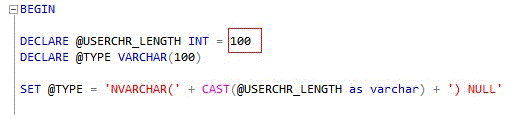
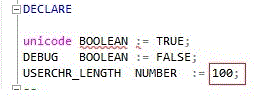
Modify the length of the user fields.
If you are using a SQL Server database:
If you are using an Oracle database:
Note: This step is optional.If you are running Cobra in an n-tier setup, you must restart the IdeaBlade service.
Attention: For more information, see "Restart the Service in an N-Tier Environment" under the "Performance Tips" section in the Deltek Cobra Installation Guide.Launch Cobra.
Learn more about ...
Import File Field Mapper Page of the Integration Wizard
Schedule Mapping Page of the Integration Wizard-MS Project
Schedule Mapping Page of the Integration Wizard-Primavera
Schedule Mapping Page of the Integration Wizard-Open Plan