Reporting
The Reporting feature allows you to run reports based on
different parameters. Reports are generated via the Reports
form. When you run a report, it is generated and displayed on the
Reports form. You can also run and save a report with a specific name,
so you can select the report again later.
Once generated, a report can be exported to Crystal Reports
(RPT), PDF, Excel, Word, RTF, and CSV.
Running a report, especially a report with a large amount
of data, may take up a lot of your system resources and cause a decrease
in performance of the Shop Floor Time web application. To prevent this
problem, you can define a separate instance of the application server
to use for processing reports. See Dedicated
Reports Server for more information.
License Requirements
This feature requires the following:
To check if the module is included in your license and
enabled:
Click Main
Menu > Configuration > System > Licensing.
On the License
Modules tab, select the Module Name
called Reporting.
The following boxes must be
checked: Licensed and Module Enabled.
Run Report
Use the Run Report
option to generate a report and view it on screen. You can then print
or export the report.
Click Main
Menu > Reporting > Reports.
If necessary, click the  Filter button to display the Report Name and Saved Reports fields.
Select a Report
Name. See Types of Reports
for information on the available reports.
From the Saved
Reports field, you can select the name of the report you want
to run. The available options depend on the Report Name you selected.
If you do not select a Saved Report, the report
you are running will be saved as the Report Name, lowercase with underscores
(e.g., action_report).
The report’s parameters display
below the Filter fields. Enter the applicable parameters.
Click Run
Report to run the report and display it on screen.
The report will be saved as the Report Name, lowercase
with underscores (e.g., action_report).
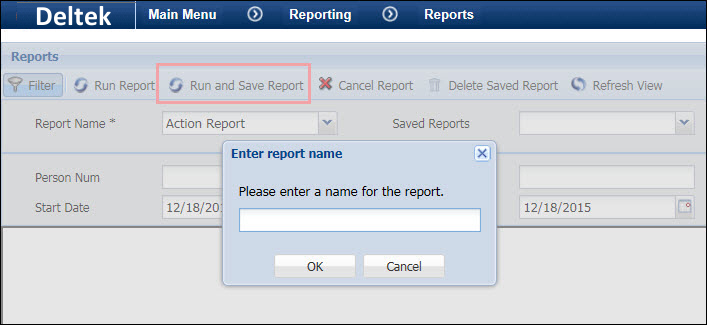
Note that if you click Run and Save Report, you will be prompted for
the report name.
While the report is processing, a message with a
spinner will display. The spinner message will display until the report
finishes processing, or for up to three minutes if the report is still
processing.
The Process Status
will indicate whether the report is still processing or is complete.
Click Refresh View to update
this status field.
While the report is processing, you can go to a
different form or log out of the web application. When you return
to the Reports form, you can use Refresh View to check the report
status.
Once the spinner message stops displaying, if the
report is still processing, you can click Cancel
Report to stop processing the report.
When the report is complete,
it will display on the form.
To modify the report, change
the report’s parameters and click Run
Report again. When you change a report’s parameters and run
the report, the new parameters will be saved with the report.
To run a different report, repeat
these steps beginning with Step 3.
Use the toolbar at the top of
the report to page through it, search for terms, print the report,
or export the report.
Run and
Save Report
You can also use the Run
and Save Report option to generate a report and view it on screen.
When you click Run and Save Report, you will be prompted to name the report
before it is processed.
The next time you want to run the report, you can select
it from the Saved Reports field (after you select the correct Report Name).
Using Run and Save Report is the same as using
Run Report, except that you will be prompted to name the report. See “Run
Report” above for more information.
Delete a Saved Report
Click Main
Menu > Reporting > Reports.
If necessary, click the
Filter button to display the Report Name and Saved Reports fields.
Select the Report
Name of the report you want to delete.
From the Saved
Reports field, select the name of the report you want to delete.
The available options depend on the Report Name you selected.
Click Delete
Saved Report.
Click OK
to confirm the action.
View,
Print, and Export a Report
When you click Run Report
or Run and Save Report, the report
will generate and display on screen.
Using the toolbar at the top of the report,
you can page through the report, search for specific
words in the report, print the report, or export
the report. For some reports, you can also display the report’s contents
in a hierarchical format using the Group Tree button.

Export
To export the report, click the  Export button. The Export
pop-up form will appear.
Export button. The Export
pop-up form will appear.
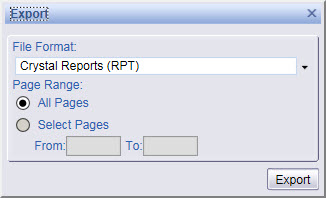
Select the following options, then click Export:
File Format: Select
the format of the file that will contain the report. Available options
are Crystal Reports (RPT), PDF, Excel,
Word, RTF,
and CSV.
Page Range: Select
which pages to include in the report.
Print
To print the report, click the  Print
button. The printing method will depend on which web browser you are using.
Print
button. The printing method will depend on which web browser you are using.
Internet Explorer
If you are using Internet Explorer, you must have the Crystal Reports Print Control installed
in order to print the report. The browser’s Print window will appear when
this control is properly installed.
If the Crystal Reports Print Control is not installed,
Internet Explorer will display an alert message when you click the Print button, asking if you want to install the Crystal
Reports Print Control. Click Install and you can continue printing the
report.
Firefox
If you are using Firefox, the Print
to PDF window will appear when you click the
Print button. The report must be converted to a PDF file before you can
print it.
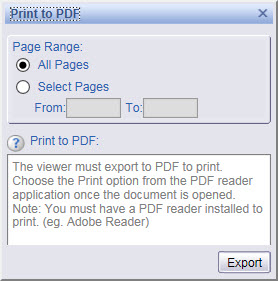
Select the pages you want to print and click the Export button. Your web browser
will ask if you want to open or save the file. Once you display the file
on screen you can print it.
Note: You can also
Export the file to Excel, Word, RTF, or CSV format,
and then open and print the report from another application.
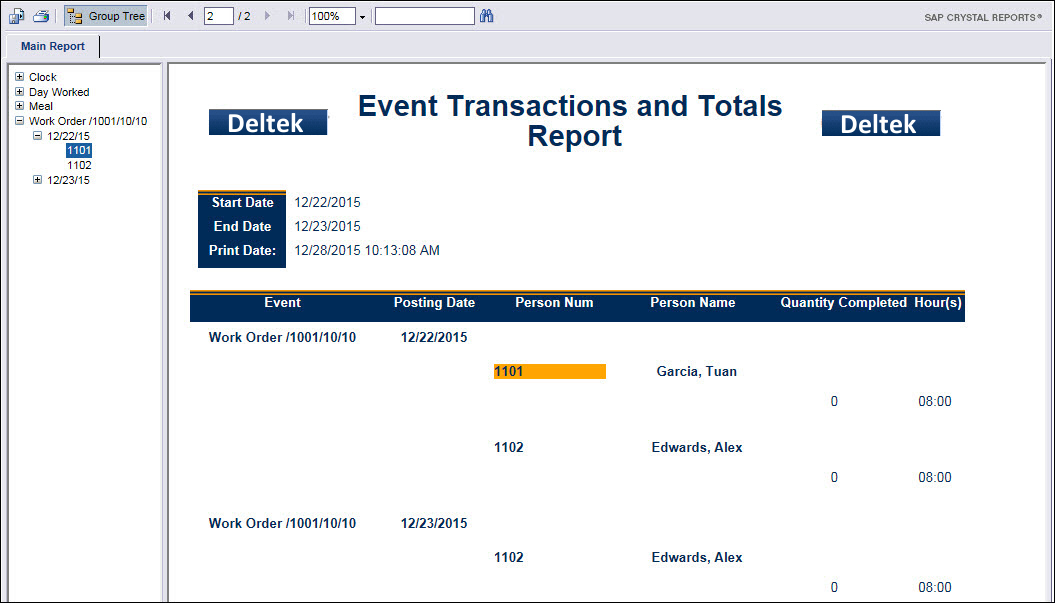
Group Tree

For some reports, you can use the Group Tree
button to view a hierarchical display of the contents of your report.
For example, in the Event Transactions and Totals Report, the data is
sorted by the Event Name, Posting Date, and then Person Number. If you
click the Group Tree button, a hierarchical display of this data will
appear to the left of the report. Click the + button next to an element
in the hierarchy to display its contents. When you click an item in the
Group Tree, the item will highlight in the report.
Page Controls
Use the page controls to view the additional
pages in the report or to zoom in and out of the report.

Search
To search the report, enter the search terms
in the text box and click the  search button.

Dedicated
Reports Server
Running a report, especially a report with a large amount
of data, may take up a lot of your system resources and cause a decrease
in performance of the Shop Floor Time web application. To prevent this
problem, you can define a separate instance of the application server
to use for processing reports.
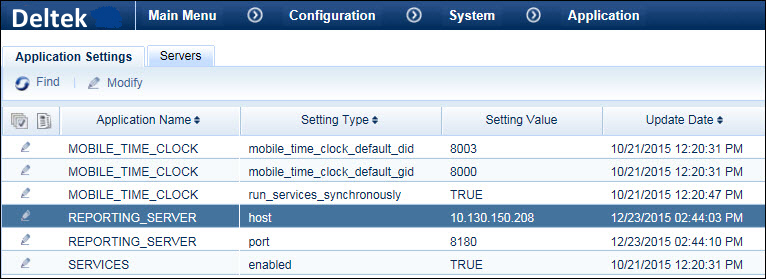
The REPORTING_SERVER Host and Port settings on the Application
form are used to identify the host name and port number of the server
where you will run reports.
By default these settings are blank, indicating that reports
will be processed on the same application server that is running the Shop
Floor Time web application.
If you specify a host and port for the REPORTING_SERVER,
then that instance of the application server will be used to process reports.
Note that the REPORTING_SERVER settings will not be used
to process Ad Hoc Reports. Ad Hoc Reports will always be processed on
the same application server that is running the Shop Floor Time web application.
Create a dedicated reports server:
Select the host and port of
the application server instance that will be used to process reports.
Install the Shop Floor Time application on this server.
On the Servers
tab of the Application form, create a record for the application
server instance from step 1.
On the Application
form, change the host and port for the REPORTING_SERVER settings
to match the application server you defined in step 2.
Report Images
Running a report, especially a report with a large amount
of data, may take up a lot of your system resources and cause a decrease
in performance of the Shop Floor Time web application. To prevent this
problem, you can define a separate instance of the application server
to use for processing reports.
The REPORTING_SERVER Host and Port settings on the Application
form are used to identify the host name and port number of the server
where you will run reports.
By default these settings are blank, indicating that reports
will be processed on the same application server that is running the Shop
Floor Time web application.
If you specify a host and port for the REPORTING_SERVER,
then that instance of the application server will be used to process reports.
Note that the REPORTING_SERVER settings will not be used
to process Ad Hoc Reports. Ad Hoc Reports will always be processed on
the same application server that is running the Shop Floor Time web application.
Create a dedicated reports server:
Select the host and port of
the application server instance that will be used to process reports.
Install the Shop Floor Time application on this server.
On the Servers
tab of the Application form, create a record for the application
server instance from step 1.
On the Application
form, change the host and port for the REPORTING_SERVER settings
to match the application server you defined in step 2.